User documentation for the tensor compute cluster at MEB
What is tensor?
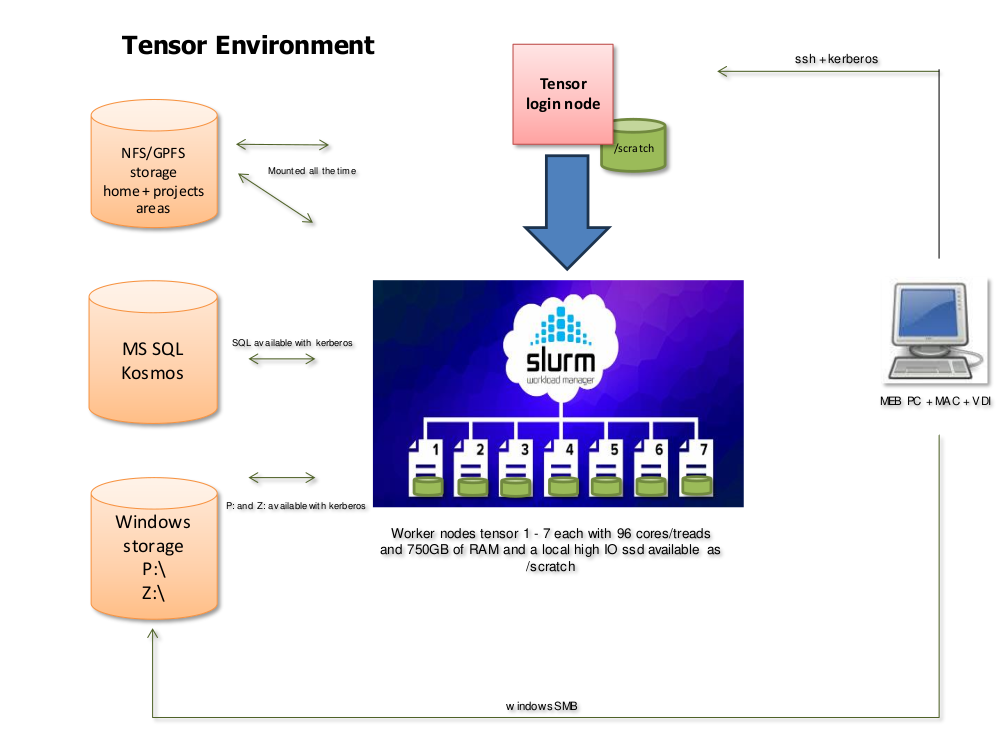
Tensor is a small High Performance Computing cluster available to MEB researchers.
The tensor cluster consists of a login node (tensor) and seven compute nodes
(tensor[1-7]) with capable CPUs and fast local storage. A selection of
common software is preinstalled, and more can be added on request.
As on larger HPC systems, work is typically done by submitting jobs to a queue system, where they will be processed in order.
Connecting
The login node tensor.meb.ki.se or just tensor is only accessible from
within MEB's network (or through VDI).
Windows
Use KiTTY, (available in MEB Software Center), or your own preferred SSH program
to connect to the host tensor.
[!TIP] Create a saved KiTTY session with the hostname
tensor, and tick the box inConnection -> Datato "Use system username". With this setting you should be able to connect without typing anything (your Windows login will be re-used).
Mac/Linux
Use ssh in the terminal, or some other interface that you prefer, to connect
to tensor with your MEB username and password.
[!TIP] Use SSH keys for passwordless login (see for example instructions at Uppmax)
Software modules
Preinstalled software packages on tensor are available through the modules (lmod) system. A quick introduction is available at the lmod website.
To run preinstalled software you first need to load it with the module load
command (or the shorter but equivalent ml).
When more than one version of a package is available you can specify which one to load or accept the default version which is usually the latest.
For example:
ml load R/4.3.2
ml load bcftools/1.19
ml load rclone
To always load a certain set of modules, add them to your .bashrc startup
script.
To see the current list of available modules (including dependencies), type ml avail. The following packages (+ dependencies) are installed:
statistics
- R 4.3.2, 4.4.0, 4.4.3, 4.5.1
- rstudio 2023.09.1, 2024.12.1, 2025.09.2
- Stata 18
genetics
- gtool 0.7.5
- qctool 2.2.0
- snptest 2.5.6
- gcta 1.94.1, 1.94.4
- plink 1.07, 1.90b7.1, 1.9.0-b.7.7
- plink2 2.00a5.10, 2.0.0-a.5.24, 2.0.0-a.6.12
- metal 2011-03-25, 2020-05-05
- EIGENSOFT 8.0.0
- bedtools 2.31.1
- htslib 1.19.1, 1.21
- bcftools 1.19, 1.21
- samtools 1.19.2, 1.21
- ldsc 2.0.1
- gtc2vcf 2023-12-06, 2025-01-03
- regenie 3.4.1, 4.1
- ricopili 2019_Oct_15.001
general tools
- ncdu 1.19
- tmux 3.3a, 3.5a
- rclone 1.65.2, 1.69.2
- parallel 20240122
- nextflow 23.10.1, 25.04.6
- lftp 4.9.2
- mebauth 0.2
- texlive 20240312
- Java 21
Installing additional software
As on most systems, you can install the software you need in your home folder if it is not installed system-wide. If there is a package you think many users would benefit from having, or which cannot be easily installed in your home folder for some reason, contact MEB IT support.
If you have the permissions required to install software modules system-wide, here is a brief guide on how to do it using Easybuild.
Running jobs - Slurm
The login node tensor has very limited capacity (by design), and is only to be
used for job submission, monitoring, and other light tasks. Any serious
computation, including interactive analyses, should be done on the compute
nodes tensor[1-7] by submitting requests for resources to the Slurm job
queue. This is a change from the recommendations for the older vector/scalar servers.
The tensor cluster currently runs Slurm version 25.05.4.
Batch jobs - sbatch
Run a batch job by preparing a shell script file with the commands you want to run on the cluster, and then submit it with the command
sbatch my_job_script.sh
You can specify the CPU core, time, and memory requirements as options to sbatch
on the command line (-c ..., -t ..., --mem=... or --mem-per-cpu=...), OR
as special comments at the start your script file (before any actual commands):
#!/bin/bash

#SBATCH -c ...
#SBATCH -t ...
#SBATCH --mem=...

...

[the code you really want to run]
See the Slurm
manual for how to
format the requirements. Some examples of commonly used formats: -c 2, -c 4,
-c 8, -c 48 for allocating, 2, 4, 8, or 48 CPU cores; -t 1:00:00, -t 0-8,
-t 5-0 for a job runtime of up to 1 hour, 8 hours, or 5 days; --mem=7000,
--mem=32G for requesting 7000 megabytes (default unit) or 32 gigabytes. Note
that the allocated memory cannot be used by others while your job is running
so try not to ask for more than you need!
If any job parameters are left unspecified, the defaults are 2 CPU threads, 7 GB RAM per CPU, and 4 hours of run time. The requirements cannot be increased once the job has started.
Note that in most cases it is not enough to ask Slurm for more CPUs to make your program run faster - you must usually adapt your code to make use of the given resources.
In some cases it can be as simple as adding a --threads N flag to some command
that already knows how to run in parallel. In other cases it can make more sense
to split the data somehow, and then submit many smaller single-threaded slurm
jobs that each work on a small part of it.
Interactive jobs - salloc
Start an interactive session on a compute node with the salloc command.
Specify the CPU core, time, and memory requirements as options on the command
line (-c ..., -t ..., --mem=... or --mem-per-cpu=...).
If any job parameters are left unspecified, the defaults are 2 CPU threads, 7 GB RAM per CPU, and 4 hours of run time. The requirements cannot be increased once the job has started.
For example, an interactive session that runs for up to one day, with access to 8 CPU cores and 56 GB RAM (given by default as 7 GB per allocated core), can be requested as:
salloc -c 8 -t 1-0
Interactive jobs with graphical display (X)
First start an X server on your local computer. On Windows this means starting the program VcXsrv (available in MEB software center). The start menu entry for VcXsrv is "XLaunch". On a Mac, try XQuartz. On Linux, an X server is usually already running, or you already know how to start one if not.
In KiTTY, tick the box "Enable X11 forwarding" under Connection -> SSH -> X11
before connecting. On Mac/Linux, add the -Y flag to your ssh command, or
add "ForwardX11Trusted yes" to the settings for tensor in your local
~/.ssh/config file.
Next, request an interactive job on tensor as usual, but add the flag --x11.
salloc [other job parameters] --x11
Graphical output from the allocated compute node (like a plot window in R) should now appear on your computer.
Monitoring Slurm jobs
To see a list of the jobs currently running (and waiting to run) on the cluster,
use the squeue
command.
The amount of job information shown can be controlled with flags. For example,
squeue -l gives the headings JOBID, PARTITION, NAME, USER, STATE, TIME, TIME_LIMIT, NODES, NODELIST(REASON). If the queue is long, and you only want
to see your own jobs, try squeue --me.
If you want to cancel a job that is running or waiting in the queue, use the
scancel command.
# cancel your job with jobid 12345
scancel 12345

# cancel ALL your running and queued jobs (use with caution)
scancel --me
To monitor the resource usage (memory/CPU) of a running job, it is possible to run a monitoring command within an existing allocation (interactive or non-interactive). Run the following on the login node in a separate window or tmux pane to start htop next to your existing job:
srun --jobid=[job ID of interest] --overlap --pty htop
The job ID of the job to monitor is displayed when it is first submitted to the
queue, and in squeue output.
After a job has finished, a brief summary of memory and CPU usage can be displayed by running
seff [job ID of interest]
This information can be useful when deciding how much memory/CPU to request for the next job.
Storage
/nfs files
Files in /nfs/[projectname]/, /nfs/projects/[projectname]/, and
/nfs/home/[username]/ are stored on fast network drives available from all
tensor nodes. Use these paths for long-term storage of data, code, and results.
/scratch
For temporary files created during a single Slurm job, which are no longer
needed after the job is finished, use the very fast node-local storage in
/scratch/tmp/. Each node's /scratch/tmp has a maximum capacity of 3.5 TB,
which can be used by jobs on a first-come-first-served basis (to ensure
access to the full capacity, you must reserve a full node).
Note that this folder is uniquely created for each Slurm job
(so jobs cannot see /scratch files created in other jobs), and it is
automatically cleared after the job ends (along with /tmp/).
P: and Z: files
The Windows P: and Z: volumes are available on tensor as /cifs/P/ and
/cifs/Z/$USER/. To access them you must have a valid Kerberos ticket (see
"Kerberos authentication" for how to get one).
[!NOTE] For jobs requiring stable and high-performance file access, we recommend the
/nfsand/scratchfile systems over/cifs.
File transfer to and from tensor
For transferring files between your computer and tensor, you can use scp (WinSCP) or sftp (FileZilla, lftp).
If you are connecting with KiTTY, there is a menu option to open WinSCP over the same connection as your terminal:
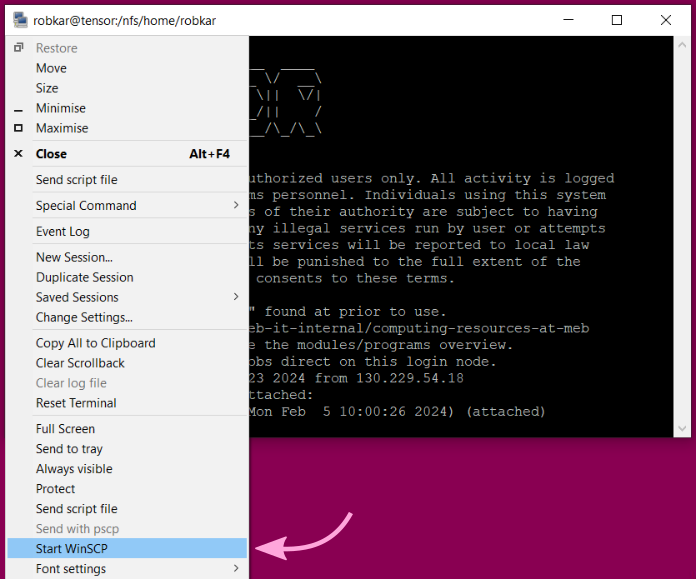
rclone is available as a software module (ml load rclone) for syncing files in cloud storage to tensor.
Accessing the kosmos SQL server
The kosmos SQL server is available from tensor with a valid Kerberos ticket
(see "Kerberos authentication" for how to get one).
Kerberos authentication
To set up credentials for a job using the kosmos SQL server and/or the Windows
P: and Z: volumes, you first need to create a "keytab" file (only once per
MEB password change cycle), and then request the actual Kerberos tickets using
the keytab file.
[!IMPORTANT] Do not share your keytab file with anyone else - it is as sensitive as your password!
A software module is available which automates the process. To use it, first run
module load mebauth
on the login node or in an interactive slurm session. Enter your MEB password when asked for it. After this, you can authenticate in any job (including batch jobs) by just loading the module. The tickets will stay valid for the duration of the job.
Non-interactive authentication by loading the mebauth module will work until
your MEB password expires. At that time you must once again load the module in
an interactive session to reauthenticate.
The mebauth module uses ktutil to save a keytab file in $HOME/.kt,
and then calls k5start to request Kerberos tickets and keep them valid.
Mailing list
To communicate with (all) other users of the tensor cluster, send an email to meb-tensor@emaillist.ki.se.
Getting an account
If you want to work on tensor and don't have an account, please apply through this form (site only available from inside MEB or VDI).
This manual maintained by Robert Karlsson, Rikard Öberg, Henric Winell
Last update 2025-11-14